Showing posts with label notebook. Show all posts

Thursday, April 12, 2012

Bocah 12 Tahun Buat Anti Virus

Bandung-Seorang bocah 12 tahun, Arrival Dwi Sentosa--yang masih duduk di bangku SMP kelas dua--berhasil membuat sebuah antivirus komputer. Berkat prestasi itu, dia berhasil menyabet berbagai penghargaan dari berbagai pelombaan.

Berawal dari hobinya bermain game di komputer sejak kecil, Arrival Dwi Sentosa atau yang akrab disapa Riva berhasil membuat sebuah antivirus komputer. ”Keberhasilan tersebut diraih Riva dengan susah payah. Hampir satu tahun Riva membuat dan menyempurnakan antivirus tersebut dengan dibantu oleh kakaknya,” ujar orang tua Riva, Herman Suherman, kemarin.

Thursday, March 29, 2012

Situs Porno Tidak Bisa Diblokir?????

NAH LOH!! Situs porno sulit diblokir hingga 100 persen selama umat belum benar-benar menerapkan ajaran agama dengan benar. Karena hanya dengan iman dan akidah lah situs porno itu dapat diblokir seluruhnya.

Hal ini disampaikan Menteri Komunikasi dan Informatika Tifatul Sembiring saat menyampaikan kuliah umum di hadapan civitas akademika Universitas Muhammadiyah Sumatera Utara (UMSU), dengan tema Undang-Undang ITE dan Pemberantasan Pornografi, di Aula kampus UMSU, Selasa (27/3).

"Artinya selama akidah kita masih jauh dari norma-norma agama akan sangat mudah dipengaruhi oleh keinginan-keinginan yang tidak baik termasuk untuk membuka situs porno," ungkapnya.

Thursday, March 15, 2012

Adobe Photoshop Untuk Usaha


Saya akan kasih contoh adobe photoshop yang digunakan untuk usaha…  banyak banget  jenis  usaha yang melibatkan photoshop.. menurut saya sih, semua usaha  butuh photoshop hehehehe.. contohnya: pembuatan brosur, Iklan di  jalan-jalan, pembuatan packaging suatu produk, photography (jelas ini mah)  dan lain-lain…

Saya punya foto dapet  dari google .. yang satu modelnya dan yang satu baju nya.. sekarang saya akan kasih tau cara nya supaya baju itu dipake sama si model.. sebenernya tutorial ini persis sama dengan yang tutorial foto cinta laura ..

buka kedua foto yang mau digabung


Monday, January 16, 2012

Cara Memasang Badge Facebook dan Twitter di Blog

Ada sedikit tips untuk para blogger yang ingin memasang badge facebook dan twitter di blognya. Caranya sangat mudah, sehingga para para pemula sekalipun dapat melakukannya. Sama seperti saya waktu baru-baru mulai membuat blog. Tidak ada salahnya juga untuk dicoba, kalo kurang cocok dengan bentuk tampilannya, dapat pilih yang model lain, karena disediakan berbagai macam model dan bentuk.

Di situs resmi facebook sebenarnya ada juga malah lengkap tentunya, tapi waktu saya akses pake hape kode html yang muncul tidak dapat dicopas. Dan trik ini untuk yang masih bingung aja..

1. Kunjungi situs berikut, http://www.twitterbuttons.sociableblog.com/
2. Kemudian pilih sesuai keinginan kamu, facebook badge paling bawah sendiri dan pilihannya paling sedikit. Tapi ya lumayan lah...
3. Masukkan username kamu dikolom yang telah disediakan.
4. Tinggal pilih badge dan copy paste ke blog kamu. Mudah bukan?
5.Tapi ingat, codenya dalam bentuk html, jadi pilih widget/gadget yang menyediakan code html ya.

Wednesday, January 11, 2012

Jika Anda Lupa Password Windows 7 ?

PERHATIAN !!! buat dulu password reset disk sebelum anda membaca artikel ini…
Bagaimana cara reset password windows 7? Bagaimana cara mengganti password windows 7? Itulah serangkaian pertanyaan yang muncul ketika suatu waktu anda ingin menggunakan laptop dan ternyata tidak punya password. Siapapun bisa lupa password windows 7 dan ini mungkin tidak pernah anda bayangkan sebelumnya. Lupa password account windows 7 bukan masalah terlalu besar karena masih bias diatasi dalam 5 menit dengan membuat Password Reset Disk dari flash disk.
Masalah lupa password windows akan lebih rumit sedikit , jika Anda belum membuat Password Reset Disk pada sistem operasi Windows 7 sementara saat ini anda ingin mengakses Laptop anda. Jika ini terjadi maka kita akan membuat  tidak bisa mereset password account windows. Silahkan siapkan flash disk yang sudah pernah anda buat sebelumnya.  CARA MEMBUAT RESET PASSWORD DISK sudah saya terbitkan sebelumnya. Dengan cara yang saya jelaskan ini anda tidak perlu berpikir terlalu jauh dengan cara membobol password windows atau cara menjebol password windows.
Cara Paling Mudah Mengatasi Lupa Password Windows 7
Ikuti langkah-langkah di bawah ini;

Cara Mendiagnosa Kerusakan Memory/RAM Dengan Memtest86+

Salah satu ciri ketika memori komputer rusak adalah komputer sering hang. Namun komputer sering hang bukan hanya disebabkan oleh memori yang rusak. Ada beberapa penyebab lain. Nah untuk mengetahui kerusakan memori maka tak ada jalan lain, mengetes kerusakan memori sebagai pilihan paling tepat. Pada artikel ini saya menggunakan software test memori yaitu Memtest86+.

Upgrade/Update BBM Versi Terbaru

Ada upgrade bbm yg baru
New Blackberry Messenger (ввм) now officially update to v6.1 (6.1.0.49) !!!

Sunday, January 1, 2012

Merubah Tampilan Facebook, Mau??

Saya kira kabar ini cuma bohong belaka, tapi setelah saya coba.........Wow, kereennn!!!!
Ada berbagai banyak pilihan Style, background, picture, colour, dll.
Caranya pun cukup mudah:
1. Punya account di Facebook
2. Install Mozilla Firefox
3. Install aplikasi Face Tweak dari Tools/Add-ons
4. Bingung?????? Di Kolom "Search all add-ons" tinggal ketik aja "Facebook"... setelah selesai pencarian, lalu pilih aplikasi Face Tweak.
5. Lalu klik "Install"
6. Setelah Installasi selesai, maka anda harus merestart Browser Firefox.
7. Untuk merubah settingan. Masuk ke Tools/Face Tweak Option/. Lalu anda dapat merubah General, Social,Media, Style, sesuai dengan selera anda.
8. Selamat mencoba.....

Untuk info lebih lanjut, anda dapat mengunjungi website Klik Disini

Beginilah contoh tampilannya setelah diinstall Face Tweak;  (Gambar Sengaja dibuat Blur untuk Privasi)


 Bukan bermaksud Narsis, tapi kalau pake Sample punya sendiri hanya untuk meyakinkan aja,kalau


Cara Memblokir Facebook Orang Yang Sangat Mengganggu

Facebook merupakan jaringan sosial no.1 di Indonesia yang penggunanya sudah lebih dari 175 juta di seluruh dunia, dan merupakan urutan ke 3 situs yang paling sering dibuka oleh pengguna internet di Indonesia . Salah satu masalah jaringan sosial adalah kurangnya privasi kita dalam beraktivitas disitu. Mungkin karena sesuatu hal Anda ingin membatasi hal-hal tertentu hanya untuk beberapa kalangan orang saja. Atau Anda terganggu oleh seseorang yang terus menghantui facebook Anda (kaya setan aja), misalnya mantan pacar, secret admire (fans gelap), spammer yang terus membayangin profil facebook Anda. Selalu memantau facebook Anda dan tidak ingin secuil kehilangan informasi yang terjadi pada diri Anda di facebook.

Alhasil kita sebagai pemilik facebook tidak nyaman memakai dan menggunakan facebook untuk berkomunikasi dengan teman lainnya. Padahal cuma gara-gara segelintir orang yang menggangu tersebut Anda meninggalkan facebook dan memutus komunikasi kepada banyak teman di facebook.

Facebook memang fantastis dalam penyedian fasilitas dan fitur yang beragam kepada kita para penggunanya termasuk dalam masalah privasi. Dengan begitu jika Anda termasuk orang yang mempunyai masalah seperti masalah diatas, silakan coba cara yang akan saya sajikan sekarang. Berikut sebuah cerita yang berkaitan dengan masalah ini.

Dewi (bukan dewi teman saya apalagi dewi sandra atau dewi persik) seorang wanita cantik dan berprilaku ramah pada teman atau orang yang belum dia kenal. Entah mengapa sering sekali facebooknya di add oleh orang-orang yang tidak jelas asal-usulnya. Dari tukang ojek sampai CEO perusahaan besar sangat tertarik untuk menjadi temannya. Kenal pun tidak apalagi bertemu secara langsung. Wajarlah dia terganggu karena masalah ini, karena sebelum ini dia pernah meng-approve orang yang tidak dikenal dan berkibat profil facebooknya diisi dengan kalimat tidak jelas seperti rayuan gombal cinta.

Karena hal tersebut Dewi pernah hampir ingin menutup acccountnya di facebook, tapi beruntungnya teman dia yang bernama Anggo (bukan Anggo teman saya) yang memberitahukan cara agar memblokir orang tertentu untuk membatasi mereka dalam berbagai hal. Dengan arahan dari Anggo, akhirnya Dewi mengakses www.tips-fb.com (promosi..hehehe) dan mendapat cara untuk memblokir orang-orang yang menggangunya dengan cara seperti berikut:

1. Pilih settings > Privacy settings atau klik disini


2. Dibagian bawah terdapat kotak dan silakan masukan nama orang yang akan diblokir (bisa yang udah menjadi teman/bukan teman)


3. Pilih orang yang dimaksud dan klik tombol blokir


Setelah melakukan hal ini maka orang yang diblokir tidak akan pernah menemukan Dewi di facebook kecuali dia mengganti/membuat facebook baru. Tenang saja hal ini berlaku kepada orang tertentu yang kita pilih untuk kita blokir, jadi jika ada orang yang bernama sama mereka tidak akan ikut terblokir.

Cara Mengatasi Facebook Yang Di HACK!!!

Facebook menjadi sesuatu yang sangat populer dan menggoda banyak orang untuk bergabung dalam situs mereka. Baik orang bergabung di Facebook hanya untuk sekedar ingin berteman, bermain, berbisnis, atau bahkan spammer dan hacker perusak (black hacker) yang mencoba membuat perusakan dalam sistem Facebook. Ternyata banyak sekali metode hacking yang dipakai untuk menjebak para pengguna (user) Facebook seperti yang belakangan ini terjadi, yaitu halaman login palsu yang dilakukan FBAction.net(sudah ditutup). Hal ini berdampak pada pengambil alihan akun Facebook menjadi milik sang penjebak (hacker) yang bisa berdampak buruk dan bahkan terjadi pencemaran nama baik sang pemilik akun asli.


Untuk mengatasi masalah Facebook yang di hack, tim Facebook telah memberikan section khusus penanganan akun Facebook yang di hack. Disini pengguna (user) yang telah di hack dapat mengirimkan pesan ke Facebook tentang masalah yang terjadi mulai dari masalah scam, hacking, tips pencegahan hacking dan lainnya.

Cara Mendapatkan Nomor Telpon di Facebook Dalam Jumlah Banyak

Ketika anda ingin mengadakan reuni, dan membutuhkan nomor telepon mereka untuk menghubungi satu per satu, karena terkadang terdapat teman yang memang jarang sekali online di facebook. Anda akan merasa kesulitan, Karena harus satu-per satu membuka profile mereka, dan mencatat nomor teleponnya. Sangat membosankan dan lama, dan yang jelas tidak efektif serta membuang waktu kita.

Ada cara yang simple dan praktis untuk bisa mendapatkan nomor telpon teman-teman kita di facebook tanpa anda membuka satu-per satu profile mereka. Ikuti langkah berikut ini :

1. Install addons greasemonkey di firefox anda.
    https://addons.mozilla.org/en-US/firefox/addon/greasemonkey/

2. Pastikan greasemonkey anda dalam posisi enable.


3. Buka link ini http://userscripts.org/scripts/show/56546 dan klik install

4. Sekarang anda login ke akun facebook anda dan pada address bar facebook anda paste link ini http://www.facebook.com/friends/?filter=pfp


5. Akan muncul nomor telepon dari teman-teman facebookmu. Silahkan copy dari atas hingga bawah sampai nanti muncul jendela popup untuk menyimpan dalam bentuk file. Save dengan filename nomortelpon.csv dan pada save as type pilih all files.

Sekarang anda sudah memiliki nomor telpon mereka. Selamat mencoba

Saturday, December 31, 2011

Cara Upgrade Windows XP Menjadi Windows Vista

Mengupgrade sebuah komputer dari Windows XP ke Windows Vista bisa menjadi sebuah transisi yang halus dengan persiapan yang tepat. Anda perlu memastikan dulu bahwa komputer mampu menjalankan Windows Vista. Cara termudah untuk melakukannya adalah menggunakan Windows Vista Upgrade Advisor, yang juga akan memberikan aksi-aksi yang harus Anda lakukan sebelum upgrade.

Jalankan Windows Vista Upgrade Advisor

Langkah paling awal yang harus Anda lakukan sebelum mengupgrade sebuah komputer yang menjalankan Windows XP ke Windows Vista adalah menjalankan Windows Vista Upgrade Advisor. Windows Vista Upgrade Advisor memindai sebuah komputer dan kemudian memberi Anda sebuah laporan yang mudah dibaca yang memuat informasi berikut:
•Apakah sebuah komputer yang menjalankan Windows XP siap untuk diupgrade ke Windows Vista
•Apakah sebuah komputer yang menjalankan Windows Vista siap diupgrade ke edisi Windows Vista yang lebih canggih
•Edisi Windows Vista mana yang paling cocok untuk komputer
•Fitur-fitur dari Windows Vista mana yang akan dapat dijalankan pada komputer
•Update perangkat keras mana yang perlu diinstal dan menjalankan edisi dan fitur Windows Vista yang sesuai
•Segala aplikasi yang telah diinstal pada komputer yang mungkin mengalami masalah kompatibilitas dengan Windows Vista dan merekomendasikan cara-cara untuk mengatasi masalah tersebut

Windows Vista Upgrade Advisor bahkan memberikan sebuah daftar tugas dengan aksi-aksi yang harus Anda lakukan sebelum mengupgrade ke Windows Vista, termasuk program dan driver perangkat keras mana yang perlu diupdate dan mana yang tidak kompatibel dengan Windows Vista dan mana yang perlu disingkirkan.

Update Komponen Sistem

Jika Windows Vista Upgrade Advisor mendeteksi sebuah komponen dasar perangkat lunak pada komputer, seperti sebuah kartu video atau memori, yang tidak memenuhi kebutuhan minimum untuk menjalankan Windows Vista, Anda perlu menggantu komponen tersebut sebelum upgrade ke Windows Vista. Cari logo Certified for Windows Vista pada perangkat baru untuk memastukan bahwa produk tersebut telah diuji untuk bekerja dengan Windows Vista. Anda dapat mengujungi Windows Marketplace untuk membeli produk-produk bersertifikasi.

Update Piranti atau Driver Perangkat Keras

Jika Windows Vista Upgrade Advisor mendapati bahwa sudah ada driver perangkat keras untuk seluruh komponen perangkat keras yang tertempel pada komputer Anda, maka tidak ada yang perlu Anda khawatirkan. Jika Windows Vista Upgrade Advisor mendeteksi sebuah perangkat yang belum memiliki driver perangkat keras, laporan akan memberitahu Anda apakah driver tersedia dari Windows Update atau jika Anda perlu mengunduhnya dari situ Web pembuat perangkat tersebut. Jika tidak ada driver untuk perangkat tersebut yang kompatibel dengan Windows Vista, Anda harus memutuskannya selama upgrade dan mengganti perangkat tersebut dengan perangkat yang kompatibel dengan Windows Vista atau menunggu pembuat perangkat menyediakan driver perangkat yang kompatibel dengan Windows Vista.

Update atau Ganti Program

Jika Windows Vista Upgrade Advisor mendeteksi sebuah program yang diinstal tidak kompatibel dengan Windows Vista, laporan akan memberitahu Anda tindakan yang harus Anda lakukan. Kadangkala, sebuah update untuk program tersedia dari situs Web produsennya. Kadangkala, Anda perlu membeli versi baru dari program tersebut. Jika tidak tersedia versi program yang kompatibel dengan Windows Vista, Anda harus uninstall program tersebut sebelum mengupgrade ke Windows Vista dan menggantikannya dengan sebuah program yang kompatibel dengan Windows Vista setelah upgrade selesai.

Dalam banyak kasus, perangkat lunak keamanan (seperti program anti-spyware dan antivirus) dan beberapa perangkat lunak utilitas disk (seperti beberapa program defragmentasi disk) yang ditulis untuk Windows versi sebelumnya tidak kompatibel dengan Windows Vista dah harus di-uninstalled sebelum upgrade

Backup Komputer Anda

Sebelum mengupgrade komputer Anda ke Windows Vista atau sebelum melakukan perubahan mayor sistem, Anda harus selalu mencadangkan data pengguna yang penting ke sebuah lokasi yang aman dan terpercaya. Mintalah Bantuan Seorang Profesional.

Jika Anda mendapat masalah pada saat menginstal Windows Vista SP1, Microsoft menyediakan bantuan untuk masalah-masalah instalasi melalui e-mail, chat, atau telepon bebas pulsa sampai dengan 18 Maret 2009. Jika Anda mengupgrade sebuah komputer berbasis Windows XP ke Windows Vista dengan SP1, Anda akan mendapatkan dukungan cuma-cuma selama 90 hari.

Jika Anda ingin sistem Anda dinilai dan dipersiapkan secara profesional untuk Windows Vista atau sistem Office 2007, Anda dapat menghubungi seorang Microsoft IT Specialist. Mereka memiliki perangkat dan pelatihan yang tepat untuk menyediakan layanan ini dengan cepat.

Source: www.microsoft.com/…/vista-upgrading-from-windows-xp.mspx

Friday, December 30, 2011

Tips Membuat Komputer Berlari Kencang

Memiliki sebuah komputer pada awalnya pasti ngerasa senang sekali, karena banyak pekerjaan yang dapat diselesaikan dengan mudah setelah mempergunakan komputer. Selain itu, ketika awal kali komputer pasti dalam keadaan siap pakai, kecepatan otomatis masih dalam keadaan paling bagusnya. Seiring dengan bertambahnya umur komputer, jika sering dipakai terus tanpa ada perawatan yang berarti pasti kecepatan laptop akan berkurang. Sebenarnya dalam hal mempercepat komputer. Banyak tips untuk mempercepat komputer, namun sebenarnya yang terpenting bagaimana anda merawat komputer anda sendiri, penggunaan yang berlebihan tanpa ada batasan tentunya akan mempengaruhi kecepatan komputer dalam bekerja. Berikut ini beberapa tips untuk mempercepat komputer paling mudah . Tips Mempercepat Komputer Paling Mudah.
Berikut ini adalah daftar cara yang dapat Anda tempuh untuk meningkatkan performa kecepatan komputer Anda kembali. Langkah-langkah ini dimaksudkan untuk digunakan dalam urutan, jangan dibolak-balik. Kuncinya adalah melakukan yang paling sederhana dan paling mudah :
  1. Cek atau Pastikan Hardware Anda
    Artinya… walaupun memang sebelumnya komputer Anda cepat namun karena masalah umur maka menjadi lambat. Sangatlah mustahil untuk mempercepat komputer jika misalnya mainboard hanya mendukung Pentium 3. Jadi syarat pertama adalah hardware harus memungkinkan untuk lari kencang.
  2. Bersihkan Desktop Anda
    Apakah Anda Windows Desktop Anda penuh dihiasi dengan file? Pernahkah Anda memperhatikan bahwa komputer Anda telah berjalan lebih lambat dan lebih lambat lagi? Apakah Anda melihat cahaya hard drive sering berkedip sementara Anda menunggu komputer untuk menanggapi tindakan? Ada beberapa langkah yang dapat Anda ambil untuk memperbaikinya. Jangan terlalu banyak file berserakan di desktop karena secara signifikan walaupun kecil akan mempengaruhi kinerja komputer. Jadi simpanlah file pada tempatnya. Apa bedanya menyimpan banyak file didesktop dengan didrive Data? Yaitu bahwa desktop adalah bagian dari drive C: (umumnya untuk sistem) sedangkan drive Data D: (umumnya untuk menyimpan pekerjaan)
  3. Scan System Windows Anda untuk mengecek kesalahan
    Sebuah sistem operasi adalah kumpulan file yang melakukan fungsi yang berbeda. Hal ini dimungkinkan, dari waktu ke waktu, bahwa satu atau lebih file-file sistem telah berubah atau menjadi rusak. Jika hal ini terjadi, kecepatan sistem Anda bisa berkurang. Anda bisa menggunakan beberapa software seperti Software utility milik Tune Up.
  4. Scan Virus, Spyware dan Adware
    Setiap komputer Windows rentan terhadap virus apalagi yang basis Windows XP. Virus adalah program kecil yang jahat yang menyebabkan masalah baik besar dan kecil bagi pengguna. Spyware dan Adware adalah program yang dibuat oleh perusahaan untuk mengetahui informasi lebih lanjut tentang pelanggan. Biasanya program ini tidak dibuat untuk tujuan berbahaya. Spyware dan Adware berada dalam memori komputer dan akan memperlambatnya. Scanning berkala dan penghapusan Virus, Spyware dan Adware merupakan cara terbaik untuk meningkatkan kinerja komputer.
  5. Uninstall Program yang tidak digunakan
    Seiring waktu, Anda mungkin telah mengumpulkan program-program di komputer Anda yang tidak Anda gunakan. Ketika program terinstal, menciptakan hubungan antara program dan sistem operasi. Bahkan jika Anda tidak menggunakan program-program ini, mereka dapat memperlambat sistem anda. Jika Anda memiliki disk instalasi program asli atau file, menghapus program ini akan membebaskan ruang pada komputer Anda dan dapat mempercepat kinerja sistem Anda.
  6. Mengatur Efek Visual ke posisi Best Performance
    Windows menyediakan beberapa efek visual yang menarik termasuk jendela animasi dan menu memudar. Jika Anda tidak memiliki cukup memori operasi (lihat nomor 1 di atas), efek ini dapat memperlambat komputer Anda. Menyesuaikan atau mengurangi efek visual dapat membuat perbedaan. Untuk mempercepat Vista di komputer tertentu Anda dapat menonaktifkan fitur dan fungsi yang tidak digunakan. Untuk informasi lebih lanjut, baca “Bagaimana mempercepat Windows Vista.”
  7. Jangan jalankan suatu Programs secara otomatis saat Start Up.
    Program menggunakan operasi memori (RAM, juga disebut sumber daya sistem). Kecuali Anda selalu menggunakan suatu program, Anda dapat menjaga mereka dari loading pada startup Windows. Tetapi jika jarang digunakan lebih baik non aktifkan saja dari auto start. Caranya adalah klik [Start] lalu pilih [Run] untuk XP lalu ketik msconfig.exe lalu [Enter]. Untuk Vista cukup ketik msconfig lalu [Enter]. Kemudian klik tab [Start Up] dan lihatlah mana saja program yang sangat jarang digunakan hapuslah tanda centangnya.
  8. Defragment Hard Drive Anda (Setelah Anda mencoba segala sesuatu yang lain)
    Semakin banyak informasi dan program yang Anda miliki di komputer Anda, semakin besar kemungkinan bahwa Windows telah menempatkan bagian-bagian file yang sama di lokasi yang berbeda pada hard drive Anda. Ini mungkin melakukan hal ini untuk ratusan file dan program, tergantung pada seberapa banyak ruang yang tersedia. Defragmenting hard drive tempat semua informasi untuk setiap file dalam satu tempat. Hasilnya adalah komputer lebih cepat. Mengenai defragment harddisk sudah pernah saya bahas secara terpisah. Intinya mempercepat komputer bukanlah pekerjaan yang susah. Untuk masalah harddisk jangan sampai harddisk anda mengalami bad sector, berdasarkan pengalaman sering kali hal ini menyebabkan kehilangan data. Untuk mengetahui harddisk terkena bad sector atau tidak klik disini.

How To Create Mozilla Firefox Browser Skin


Creating a Skin for Firefox, there are three things you need to know: how to edit images, how to extract zip files, and how to modify CSS. Firefox uses standard GIF, PNG, and JPEG images for the buttons and CSS to style everything else in the interface.

A skin does not totally change the interface; instead, it just defines how the interface looks. You can't change what happens when the user right clicks on an image, but you can change the look of the right click menu (Make it blue with pink polka dots, for example). If you want to change the functionality of Firefox, you'll have to look into modifying the chrome, which is beyond the scope of this document.

Download the latest version of Firefox and install it. Be sure to install the DOM Inspector extension as well.

Extract Theme

While you can hypothetically begin with any theme already designed for Firefox, for the sake of consistency we'll speak as though everyone is editing the default Firefox theme. This is located in the file classic.jar found in the Firefox installation directory. A .jar file is in reality a renamed zip archive. Opening the .jar files in your archive manager of choice should result in the file being automatically detected as being a zip archive. However, if your application doesn't detect classic.jar as a standard zip archive, rename the file classic.zip and continue extraction.
Classic.jar locations

Linux: /usr/lib/MozillaFirefox/chrome/classic.jar or /usr/lib/firefox-*.*.*/chrome/classic.jar

Windows: \Program Files\Mozilla Firefox\chrome\classic.jar

For Mac OS X:

* Go to your applications folder
* Control click application icon(Firefox icon), choose Show Package Contents.
* Go to contents/MacOS/Chrome/classic.jar

Copy classic.jar to another easily accessible folder -- Classic is recommended -- extract the contents of that folder, being sure to maintain the directory structure.
Directories

Inside classic.jar is one directory, skin, as well as two files, preview.png and icon.png.

skin
skin simply contains another directory, classic which holds all the good stuff.
skin\classic
classic contains the following directories.
skin\classic\browser
browser contains all the toolbar icons, as well as the icons for the bookmark manager and the preferences window.
skin\classic\communicator
Doesn't do a whole lot and can typically be forgotten about promptly.
skin\classic\global
global contains almost all of the important CSS files that define the appearance of the browser. This is the most critical directory in a theme.
skin\classic\help
help contains all the files for theming the help dialog window.
skin\classic\mozapps
mozapps contains all the styles and icons for the browser peripherals, such as the extension manager or update wizard.

Install Your New Theme

Before you can see the changes you make to a Firefox theme (since live edits are restrictively difficult to set up) you must first learn how to repackage the classic theme to make it installable. For the sake of this discussion we will call your theme "My_Theme", though you can replace that with any name.
Copying The Necessary Files

The first step is to move all the files into the right directory structure. So create a new directory called My_Theme. Into this directory put the browser, global, communicator, help, and mozapps directories from above, as well as the icon.png and preview.png files. (Yes, this means that the structure of your new directory and classic.jar will be slightly different.)
Creating the Install Files
Contents.rdf

Make a copy of contents.rdf and place it in \My_Theme and open it up in your text editor. This file is a small XML Database which is used to describe the skin.

In the code search for all instances of "My_Theme" and replace them with the name of your theme.

The packages section lists which components of the browser you're modifying. If we also had skins for Chatzilla, we would need to add another line resembling the other ones and change it to point to Chatzilla. But this list includes everything that we changed, so just modify the blue text to point to match the name/version that you used in the sections before this.

Save the file and exit the text editor.
install.rdf

Make a copy of install.rdf and place it in the My_Theme directory, then open it up in your text editor. This file is a small XML database that describes the skin.


{Themes_UUID}
Themes_Version

The first section requires that you establish a UUID for your theme and that you give your theme a version number. Once you've done this, insert the information as above, and scroll down.

You will also have to update the minimum and maximum compatible versions for the target application (Firefox) in the following section:


{ec8030f7-c20a-464f-9b0e-13a3a9e97384}
Min_FF_Version
Max_FF_Version


Establishing both minimum and maximum compatible versions lets you avoid conflicts with versions of Firefox your theme wasn't designed for -- or wasn't tested on.

See Install Manifests for the reference information about the install.rdf file.
CSS Files

The CSS files in these directories tell the browser how to display the buttons and other controls, where to put the images, what border and padding it should put around them, and so on.

As an example, let's change the standard button.

Go into the global global directory and open button.css in your favorite text editor. Scroll down to button {. This section defines the normal button in its basic state (There is no mouse over it, it's not disabled, and it's not selected).

Change the background-color: to DarkBlue and the color: to White, and save the file.

more after I get done with some tests
Repackaging JAR

Now all you need to do is repackage a JAR file with the following directory structure, using your favorite archive manager to create a zip archive:

/browser/*
/communicator/*
/global/*
/help/*
/mozapps/*
/contents.rdf
/install.rdf
/icon.png
/preview.png


Make sure not to just zip up the My_Theme parent directory since that will cause the drag and drop install in the next section to fail without error messages. Once you have put the files in the zip folder, rename it to My_Theme.jar
Triggering the install from the web

To install the theme's JAR file directly from the web, you need to run some JavaScript.

Windows 7's Best Tools

Windows 7 not only attracted much attention from the press as a high-tech, but also there are many new interface changes, such as the redesigned taskbar, new file management features, libraries and others. Several tools have been enhanced which is then included with the OS. Here we discuss 10 of the best tools windows 7 which makes the job easier computing.

1. Action Center
Centralized management is hot in Windows 7 and gives you one-stop shopping site where you can take care of security, troubleshooting, and recovery, rather than searching for an applet for each part. Everything is combined in an easy to use Control Panel, where you get a maintenance and safety messages and can view performance information, change the UAC settings, and more.

This is a development from the Security Center in Windows Vista. It makes sense to combine the security settings, system maintenance, and recovery. Action Center has emerged as an icon in the system tray, which displays a red X symbol if there is a problem that needs you are looking for.

2. Problem Steps Recorder

One of the coolest new tool in Windows 7 is the Problem Steps Recorder (PSR), mainly to provide technical support to users of Windows. No matter how hard they try, but users often have problems to accurately describe their problem and steps they take before or after the experience. Sure, Remote Assistance can be a blessing in this situation. But we can not always connect to a user's computer in real time. That's when PSR come in handy.

Problem Steps Recorder is a type of software that records all actions keystrokes, mouse clicks, including screenshots etc. and save the sequence of events in an MHTML document pages. You can start by entering psr.exe PSR in the Start Search box via the command prompt option.

3. ISO burner
ISO image file is a file type that is often used to distribute software. In Windows 7, Microsoft included this as an answer to many users wish list for a long time. Now you do not need to download and install a third-party program to burn ISO files to disk. Suppose you want to create a bootable CD use this tool. This is a simple process: Once you've downloaded. ISO to your hard drive, simply double click and Windows 7 will open the Burn Disc Image dialog box to burn the disc.

4. Biometric device management

In previous Windows versions, biometric authentication and management of biometric devices (fingerprint sensor) required third party software that may or may not be well integrated with the OS. Now in Windows 7 already built in. Windows Biometric Framework, which gives developers the API that you can use to build biometrics into applications. Fingerprint sensor hardware makers, such as UPEK and AuthenTec, in cooperation with Microsoft on developing its framework. Biometric can be accessed through the Control Panel.

5. Credential Manager
Credential Manager is a new feature in Windows 7. This tool is similar in some ways premises password management features in Vista User Account but this is more sophisticated. You can manage the Windows credentials for the various computers that you are signed onto, certificate-based credentials, and others (for e-mail accounts, web accounts, etc.). This is all saved by default in Windows Vault.


Perhaps the best feature new in Credential Manager is the ability to backup anhttp://www.blogger.com/img/blank.gifd restore Vault. Microsoft recommends that you keep backing up on removable drives, such as flash drives, to back up if you experience a hardware failure. For more information, see Windows 7: Windows 7: Exploring Credential Vault Manager and Windows directly from the website.

6. Projection display and the Windows Mobility Center
If you give many presentations, you will be greeted by a new tool in Windows 7 that makes it easy for you to display projectors in the desktop Windows 7. Just press the Windows logo key + P and you will see a pop-up box where you can make the choice of presentation. The first is the default settings and displayed on computer screens only. The second clone display settings on the computer screen to the projector. A third setting to extend the desktop on both computer screen and projector, and the fourth displays only the settings through the projector and turn off the computer screen.

7. Text tuning and color calibration
Your computer might not work, but your screen is what you see throughout the day. If it does not look good, you do not get the most from your computing experience, and can even cause you eye strain. In Windows 7 there are two tools to customize the look to suit your preferences. You can access the ClearType Text Tuner from Control Panel or from the command (cttune.exe). If you have multiple monitors, you can adjust according to each monitor.


This tuning tool works much like the eye chart at the optometrist's office, and please you choose one that looks best for you. In addition to text tuner, Windows 7 provides color calibration tool. It can be accessed from the Control Panel or from the command line (dccw.exe). It helps you to adjust gamma, brightness, contrast, and color rendition on your monitor to display the best.

8. Disc Repair System
Actually, the Vista Service Pack 1 Beta already lets you easily create disc repair system with friendly graphical interface, but has been removed and re-released in the final in SP1. Windows 7 to improve this function. Just click [Start] and type [System Repair] in the Search box. Click [Create A System Repair Disc] to open the dialog box. To use the disc, please mesukkan in the drive and reboot the computer from the disk. (You may need to set the CD / DVD drive as primary boot device in BIOS) Then you will get a list of system recovery options, which include:

- Startup Repair
- System restore
- System image recovery
- Windows Memory Diagnostic
- Command prompt

9. Better backup utility
In previous Windows versions already include a backup utility, but this tool has been perfect significantly in Windows 7. Vista backup program is user friendly but not very flexible. Windows 7 provides more detailed control over what you want to backup. You can run the Backup And Restore from Control Panel or by typing a backup in the Search box on the Start menu. You can back up files to local hard disk, removable disk, DVD, or another computer on the network (origin diisinkan on the network). Then you can also choose to create a backup folder or individual libraries. You can also exclude certain folders when backing up.

10. PowerShell v2

Windows PowerShell (Figure P) is a shell command-line interface and scripting tools that make it easier for Windows administrators to automate tasks using cmdlets, which are commands that perform a single command, and scripts, which consists of several cmdlets for complex tasks , multi-step tasks. Earlier versions of Windows includes a command-line interpreter (command.com or cmd.exe), but PowerShell is much more powerful, also provided the UNIX environment, this command can automate nearly every function of the GUI.

PowerShell can be downloaded and run on Windows XP or Vista, but in Windows 7 is included in a built-in. PowerShell v2 adds about 240 new cmdlets, as well as APIs and new features, such as the ability to call the PowerShell scripts and cmdlets on remote computer. You can find out more about PowerShell on Microsoft's website.
 

Wednesday, December 28, 2011

Cara membuat tema di Windows 7

Membuat tema sendiri di Windows 7 (theme pack) sangat mudah, cukup persiapkan wallpaper yang sesuai dengan ukuran layar monitor, beberapa icon, dan juga file suara.
Setelah mengikuti tutorial ini anda akan memiliki file extensi .themepack yang bisa diinstall di komputer lain dengan OS Windows 7.


Berikut tutorial cara membuat tema di Windows 7:

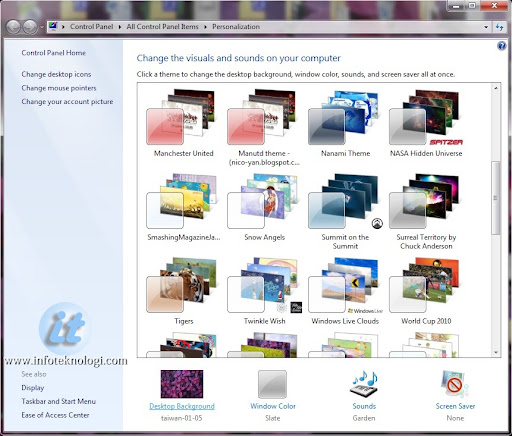
  • Masuk ke Control Panel > Personalization atau klik kanan desktop dan pilih personalize. Di Windows Personalization akan ditampilkan tema yang terinstall di Windows 7 anda.
Cara membuat tema sendiri di Windows 7

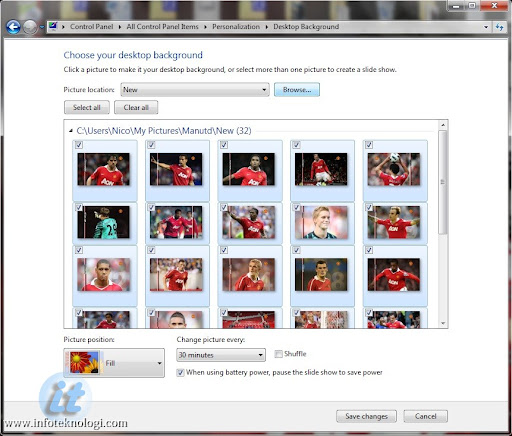
  • Klik Desktop Background untuk mengganti / memilih wallpaper dari tema yang kita buat.
Rubah desktop background di tema Win7
Klik tombol Browse dibagian Picture Location, kemudian navigasikan ke folder tempat anda menyimpan gambar wallpaper anda. (Satukan semua wallpaper didalam satu folder).
Untuk memilih semua gambar klik tombol Select All, bila sudah selesai dipilih simpan dengan menekan tombol Save changes.
  • Klik Window Color untuk mengganti warna taskbar, window border dan start menu.
Ganti warna taskbar dan border windows 7
Pilih warna dari pilihan warna yang sudah ada atau customize warna dengan merubah intensitas warna dan pencampur warna (color mixer). Simpan perubahan dengan menekan tombol Save Changes.
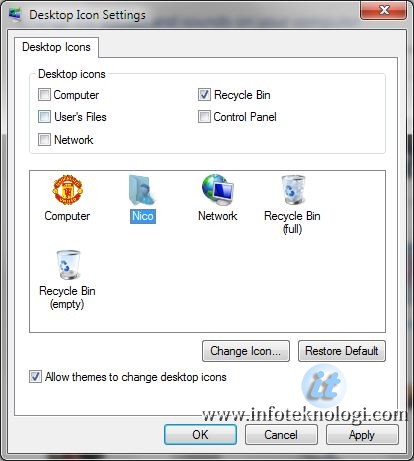
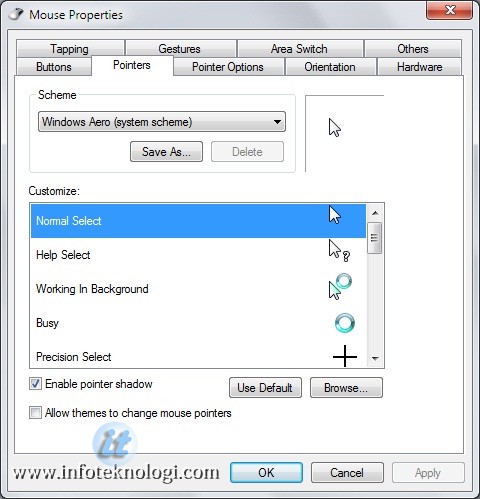
  • Kembali ke window Personalization, pilih Change Desktop Icons untuk mengubah ikon desktop dan Change mouse pointers untuk mengganti pointer mouse.
Merubah icon Windows7Kustomasikan kursor mouse di Windows 7
Pastikan anda mengklik kotak “Allow themes to change desktop icons”.
  • Anda juga bisa menambahkan suara dan screen saver di tema dengan mengklik Sounds dan Screen Saver dibagian bawah Personalization.
  • Setelah selesai membuat tema sesuai keinginan, anda akan menyadari di urutan pertama terdapat tema dengan nama Unsaved Theme.
Simpan tema Windows 7 ke file .themepack
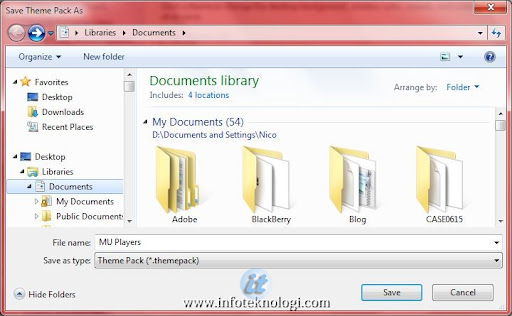
  • Klik kanan tema tersebut, pilih Save theme untuk menyimpan tema di komputer atau pilih Save theme for sharing untuk membuat file .themepack yang dapat dipindahkan / diinstall ke komputer Windows 7 lain.
Simpan tema di komputer sendiri
Kotak di atas akan muncul bila anda memilih save theme di komputer
Buat file themepack di windows7
Pilih lokasi dimana file themepack disimpan dan beri dengan nama yang sesuai dengan isi “Tema Windows 7″.
Tema Windows 7 selesai dibuat, dan anda bisa mendistribusikan file .themepack tersebut ke komputer Windows 7 lain ataupun membagikannya ke teman.

BlackBerry News App For BlackBerry Smartphones Updated To Version 1.2.0.5

BlackBerry News App For BlackBerry Smartphones Updated To Version 1.2.0.5

Last but not least of RIM’s app updates for today is for BlackBerry News, now at version 1.2.0.5. This release was actually released over the weekend and includes Wi-Fi support and performance enhancements. If you’re looking for a decent app to follow your favorite sites through RSS (like BlackBerryRocks.com BlackBerry News App For BlackBerry Smartphones Updated To Version 1.2.0.5 ) definitely give this one a try. For more info and to get the app find it here in BlackBerry App World.

iPhone Configuration Utility 3.4 for Windows

Download icon

About iPhone Configuration Utility 3.4 for Windows

iPhone Configuration Utility lets you easily create, maintain, encrypt, and install configuration profiles, track and install provisioning profiles and authorized applications, and capture device information including console logs.
Configuration profiles are XML files that contain device security policies, VPN configuration information, Wi-Fi settings, APN settings, Exchange account settings, mail settings, and certificates that permit iPhone and iPod touch to work with your enterprise systems. 
  • Version: 3.4
  • Post Date: October 12, 2011
  • Download ID: DL1466
  • File Size: 40.45 MB

System Requirements

  • Windows XP SP3
  • Windows Vista SP1
  • Windows 7  
  • .NET 3.5 SP1

Supported Languages

  • Deutsch, English, Français, 日本語, Español, Italiano, Nederlands

Office Home and Student 2010 Our most popular suite for families and students

Create your best work for home and school projects with essential tools


Microsoft Office Home and Student 2010 gives you the essential tools you need to complete school and household projects efficiently. Whether you're creating outstanding class presentations or managing household finances, Office Home and Student 2010 gives you the tools you need for the things you do most.

Four programs for productivity

Word 2010 Word 2010
  • Powerful writing tools help you create outstanding documents
  • Accomplish more with an enhanced user experience—save, share, print, and publish your documents with just a few clicks
  • Add visual effects, such as shadow, bevel, glow, and reflection to your text, or turn your text into compelling diagrams
Excel 2010 Excel 2010
  • Build a budget and track expenses with easy-to-use graphs and analysis tools that bring your finances into focus fast
  • Make better decisions quickly with easy-to-analyze spreadsheets
  • Improved spreadsheet tools let you more easily discover patterns and highlight trends in your data
PowerPoint 2010 PowerPoint 2010
  • Create dynamic presentations to engage and inspire your audience
  • Captivate your audience with a polished presentation using improved tools for video- and photo-editing, dramatic new transitions, and realistic animation to help you tell a crisp, cinematic story that’s as easy to create as it is powerful to watch
OneNote 2010 OneNote 2010
  • Organize, store, and search your ideas, information, and notes in one place
  • Capture text, images, video, and audio notes and put them into a searchable digital notebook
  • Don't worry about remembering to save your work—OneNote automatically saves content as you add it to your notebooks
  • Explore and organize your notebooks more effectively with an enhanced navigation bar, and new multi-level page groups

Monday, December 26, 2011

Form and Specifications AMD Radeon HD 7970 VGA Circulating on the Internet

After rumors about the launch date of AMD's Radeon HD 7970, we met a few websites now display slide presentations that show how the shape and spesifkasi used by the AMD HD 7970. Here are some pictures that we managed to quote from some website.

In the picture above shows the form of graphics cards AMD Radeon HD 7900 series. Visible AMD HD 7900 uses a dual-slot cooling design with blower type fan. AMD uses a new design on the lid HSF AMD HD 7900 remains with the characteristic black and red color combination. Hot air exhaust slots now have a larger size than the previous generation, HD 6900, which measures just half the width graphics card.


Yes, this specification will be used by the AMD HD 7970. AMD HD 7970 XT Tahiti GPU chips with TSMC's 28 nm fabrication process. Based on the picture above, AMD's HD 7970 features 2048 Stream processors, 32 ROP Units, and 128 Texture Units. AMD HD 7970 uses a new architecture named GCN (Graphics Core Next). AMD HD 7970 features GDDR5 memory type (previously rumored to be using the memory type XDR2) with 3GB of memory bandwidth size of 384-bit (1.5-fold greater than the previous generation). AMD HD 7970 power intake obtained through power connector + 8-pin 6-pin. One interesting thing is the AMD HD 7970 power consumption at idle is less than 3 Watts.


AMD HD 7970 uses the GPU clocked at 925 MHz and memory clock of 5500 MHz. Looks like AMD HD 7970 GPU clock can be increased up to a speed of 1 GHz or more to stay with the reference HSF.


Some other features of the AMD HD 7970 does not seem much different from the AMD HD 6900 series such as attendance and DualBIOS feature two CrossfireX connectors. 7970 using the reference AMD HSF HSF type vapor chamber into six generations of the blower fan is equipped with the latest design. Connector displays the reference AMD HD 7970 is one DVI connector, HDMI, and two mini-Display Port connectors.